
Load balancers reliably distribute traffic across multiple backend servers. NS1’s inbound API data feeds and SHED_LOAD filter can globally load balance DNS traffic across all of your points of presence (POPs).
How does this work in practice? The API data feeds use live metrics ingested from your load balancers (or any other hardware or software). The SHED_LOAD filter allows you to set low and high watermarks for each of your POPs, either statically or dynamically. When your load balancer reaches the low watermark, NS1 will begin to change the DNS responses to remove some traffic from that POP. As the indicated value received climbs higher, NS1 will continue to redirect progressively more traffic. If the high watermark is reached, NS1 will completely stop serving that POP as available until such a time as the load balancer indicates that it is below the high watermark again. In combination with the UP filter and health checks, this ensures that users are not routed to down or over-capacity endpoints.
Example: Shed Load with NS1 and HAProxy Setup
In this example we will walk through setting up load shedding with NS1 using HAProxy (although any software or hardware capable extracting metrics from could be used as well) across a simulated global network of 3 POPs.
Sections in this Article
Example: Shed Load with NS1 and HAProxy Setup
3 POP Locations
Setup NS1 API Data Source & Data Feeds
Setup HAProxy to Send Metrics to the Data Feeds
Configure the Domain and A Record
Configure the Filter Chain
3 POP Locations
1. LGA01 – New York |
2. LAX01 – California |
3. LHR01 – United Kingdom |
Actionable Metric: Total Connections to the HAProxy frontend.
NOTE: Any measurable metric can be used.
Setup NS1 API Data Source & Data Feeds
Step 1
Generate an API Key in the NS1 Portal
Step 2
Create an NS1 API Data Source, which acts as a container for the Data Feeds, with this call:
curl -sH 'X-NSONE-Key: apikeygoeshere' -X PUT 'https://api.nsone.net/v1/data/sources' -d '{"sourcetype": "nsone_v1", "name": "HA_PROXY_CONNECT"}'
The returned JSON body will resemble this:
{

 "status": "ok",

 "name": "HA_PROXY_CONNECT",

 "feeds": [],

 "config": {},

 "id": "760e670096f4f59dec045bed383aac5c",

 "sourcetype": "nsone_v1"

}
NOTE: The “id” field contains the UUID value we will use in creating our webhook POST address like so:
https://api.nsone.net/v1/feed/...
Step 3
Create the individual Data Feeds inside of the newly created Data Source.
This call creates the Data Feed for our LGA01 HAProxy instance:
curl -sH 'X-NSONE-Key: apikeygoeshere' -X PUT 'https://api.nsone.net/v1/data/feeds/760e670096f4f59dec045bed383aac5c' -d '{"name": "lga01", "config": {"label": "lga01"}, "destinations": []}'
NOTEs:
The last section of the URL is our Data Source “id” once again.
The “name” field is for human readability purposes.
The “config.label” value will be what is used in the POST values later.
For the sake of clarity, we configure these two fields with the same value.
Step 4
Repeat Step 3 two more times substituting lax01 and lhr01 for lga01 to finish creating all three Data Feeds.
Setup HAProxy to Send Metrics to the Data Feeds
NOTE: HAProxy does not directly contain the ability to send to outbound webhooks, but with a few simple modifications and basic CLI utilities we can start sending HAProxy metrics to our Data Feeds.
Step 1
Access the LGA01 HAProxy server.
Step 2
Edit /etc/haproxy/haproxy.cfg and add the following line in the global section:
stats socket /var/run/haproxy.sock mode 600 level admin
NOTE: If you may need to use the socket interactively, you will want to add a timeout value to the global section as well to allow the socket to wait for input:
stats timeout 1m
Step 3
Reload HAProxy.
Step 4
You should now see general info and also comma delimited stats using netcat non-interactively with the following commands:
echo "show info" | nc -U /var/run/haproxy.sock stdio
echo "show stat" | nc -U /var/run/haproxy.sock stdio
NOTE: This should verify HAProxy stats socket is functioning as expected.
Step 5
Generate a New API Key in the NS1 Portal This API key should be limited to Data Sources and Data Feeds. It will be used for steps 6 - 8.
Step 6
Record the Data Source “id” from Step 2. It is used in this step as the “SourceUUID”.
Step 7
Construct 3 BASH scripts, one for each POP, to gather current connections to the frontend.
NOTE: Any language may be used for the script.
The script will (1) query the socket, (2) grab the value(s) we want, and (3) POST to the associated Data Feed.
#!/bin/bash

APIKey='apikeygoeshere'

SourceUUID='760e670096f4f59dec045bed383aac5c'

Region='lga01'

CurrConns=`echo "show info" | nc -U /var/run/haproxy.sock | grep CurrConns | cut -d " " -f2`

curl -sX POST -H 'X-NSONE-Key: '$APIKey

'https://api.nsone.net/v1/feed/'$SourceUUID -d '{"'$Region'":

{"connections": '$CurrConns'}}'
The Region value will change to reflect each POP we set this up on.
Step 8
Save the script as /root/shed_load.sh and set it up to fire off once a minute in the root crontab by executing:
crontab -e
Then adding the following task:
*/1 * * * * /root/shed_load.sh
Step 9
Repeat steps 6 - 8 for LAX01 and LHR01.
The metrics are being ingested by the NS1 API data feeds.
Configure the Domain and A Record
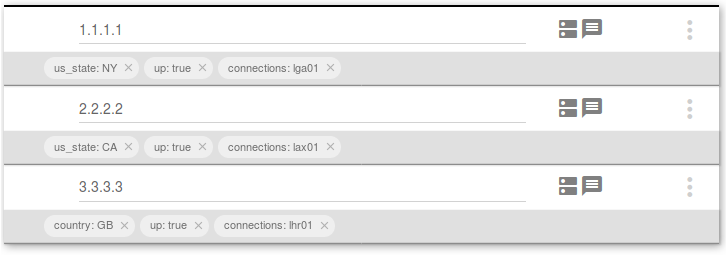
Each Data Feed can be attached to as many targets (records, answers, or groups) as needed. For clarity we have created a record with three possible answers to correspond to each of our POPs:
· 1.1.1.1 – LGA01
· 2.2.2.2 – LAX01
· 3.3.3.3 – LHR01
Configure the Filter Chain
For our basic filter chain we will use UP with Up/Down metadata attached to each answer. In the case of a production record, the answer level metadata would be triggered by NS1 Monitoring or another 3rd party health check service, but for the sake of this example, we have statically configured them to UP.
The next filter we use is GEOTARGET_COUNTRY, and attached location metadata of New York to 1.1.1.1, California to 2.2.2.2, and United Kingdom to 3.3.3.3. This will establish an initial baseline of targeting requesters to the geographically closest POP to them.
Our third filter is the SHED_LOAD filter, which will work in conjunction with the Data Feeds we have just configured. In order for load shedding to be effective, we need the record to be refreshed often, so we set the base record TTL at 30 seconds. In the SHED_LOAD filter itself, we select the Load metric of Active connections.
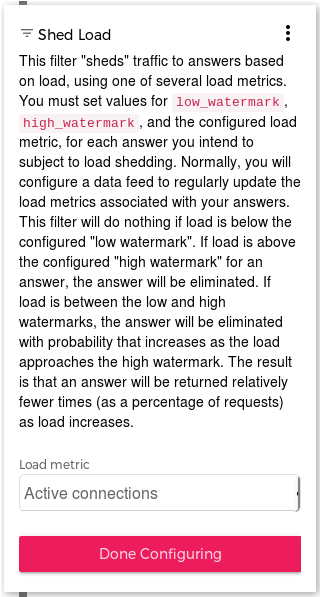
There will be three distinct metadata types that work in conjunction with this filter: High watermark, Low watermark, and Active connections.
While each watermark can be different or even dynamic for each answer, we went ahead with the assumption that all of our POPs have equivalent capacity, and assigned a High watermark of 1900 and a Low watermark of 1600 at the record level.
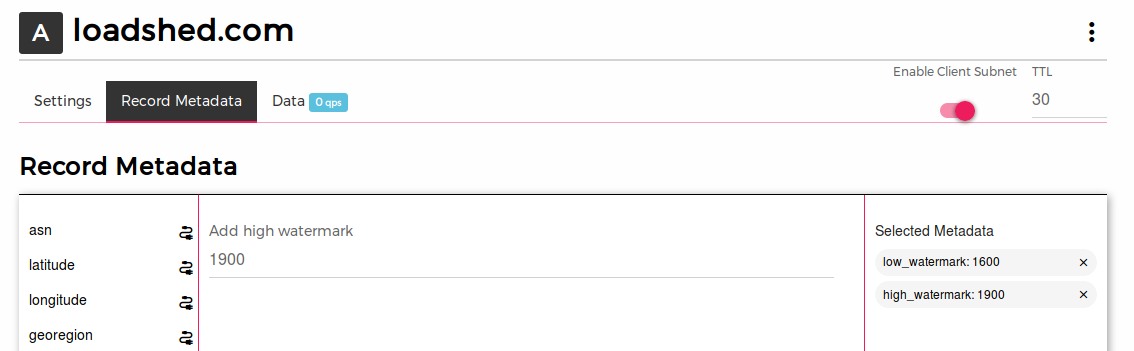
These limits are in turn inherited by all answers in this record, and we should begin to progressively remove an answer from service at 1600 concurrent connections and eliminate serving it entirely at 1900 concurrent connections.
The Active connections metadata is attached individually to each answer, selecting the HA_PROXY_CONNECT Data Source, and then selecting the the matching Data Feed for the respective answer (lga01, lax01, or lhr01).
Finally, our last filter is SELECT_FIRST_N, and we set this equal to 1.
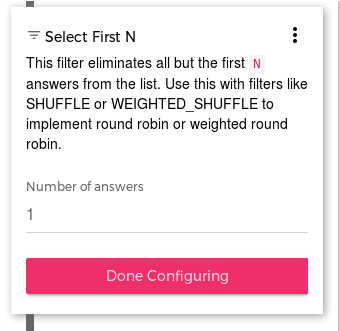
This causes us to serve only the single best answer to the requesting recursive resolver which may otherwise introduce it’s own shuffling behavior to a sorted list of answers.
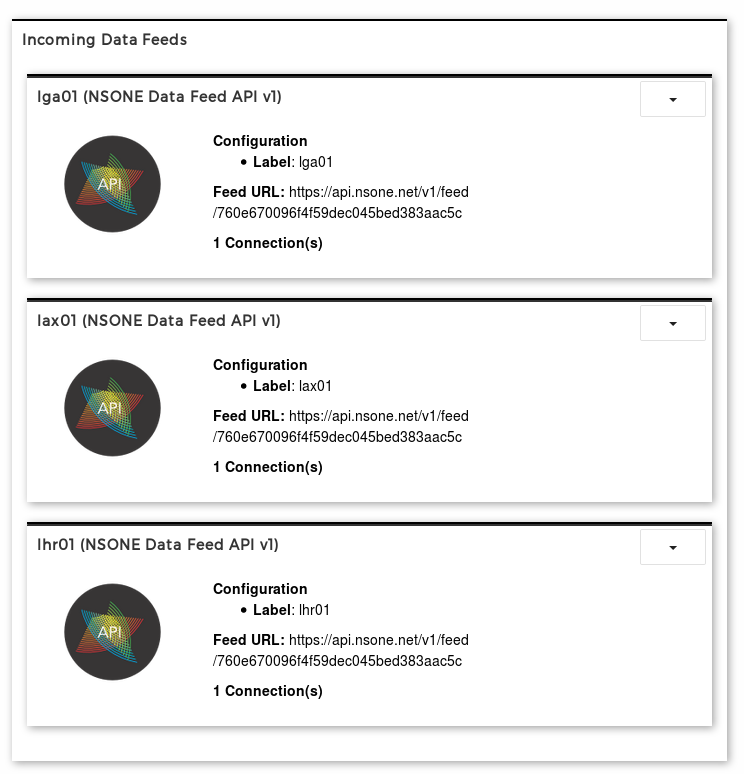
After we have finished configuring our record, and attaching it to the three Data Feeds, we should now be able to see all the connections are active in the Incoming tab of the Integrations section in the portal.
This process can be extended to work with any arbitrary metric you wish, from anything that can POST simple JSON output to NS1 API Data feeds.
Visit our Developers Hub and Knowledge Base for technical articles, webinars, or to see our platform in action.