
This is the second part of our series on using DIG. You can read the first post on Decoding DIG Output here.
The dig command is a powerful tool for troubleshooting queries and responses received from the Domain Name Service (DNS). It is installed by default on many operating systems, including Linux and Mac OS X. It can be installed on Microsoft Windows as part of Cygwin.
Windows users get to have a little more hands-on approach to initial setup as BIND is not part of the stock Windows kernel. This can be easily remedied by visiting isc.org and downloading the appropriate BIND package for your system - 32 or 64 bit. Once that has been installed and configured, the instructions and data output in this article will be the same as that of a Mac or Linux.
One of the myriad things dig can do is to perform a recursive DNS resolution and display all of the steps that it took in your terminal. This is extremely useful for understanding not only how the DNS works, but for determining if there is an issue somewhere within the DNS name hierarchy that is causing resolution failures within your own zone, or domain.
Does your enterprise face some of these common DNS challenges?
Learn more about the most common enterprise DNS challenges in automation, change propagation, and traffic management and how to resolve them in our guide, Three Common Enterprise DNS Challenges and How to Solve Them.
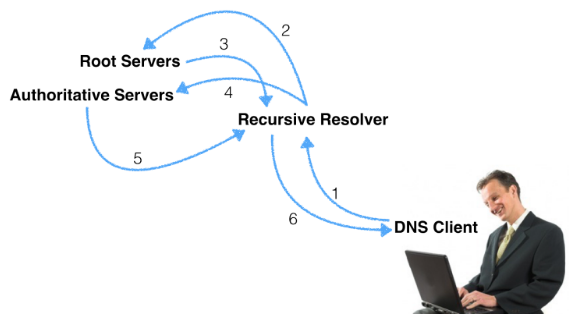
First, let’s briefly review how a query recursively receives a response in a typical DNS resolution scenario:
- You as the DNS client (or stub resolver) query your recursive resolver for www.example.com.
- Your recursive resolver queries the root name server for www.example.com.
- The root name server refers your recursive resolver to the .com Top-Level Domain (TLD) authoritative server.
- Your recursive resolver queries the .com TLD authoritative server for www.example.com.
- The .com TLD authoritative server refers your recursive server to the authoritative servers for example.com.
- Your recursive resolver queries the authoritative servers for www.example.com, and receives 1.2.3.4 as the answer.
- Your recursive resolver caches the answer for the duration of the time-to-live (TTL) specified on the record, and returns it to you.
The above process basically looks like this:
You can watch this process in action by running dig with the +trace parameter, as in:
Step 1 | $ dig +trace www.example.com |
Step 2 | ; <<>> DiG 9.10.2 <<>> +trace www.example.com ;; global options: +cmd . 13382 IN NS e.root-servers.net. . 13382 IN NS f.root-servers.net. . 13382 IN NS c.root-servers.net. . 13382 IN NS k.root-servers.net. ;; Received 397 bytes from 8.8.8.8#53(8.8.8.8) in 36 ms |
Step 3 | com. 172800 IN NS j.gtld-servers.net. com. 172800 IN NS g.gtld-servers.net. com. 172800 IN NS e.gtld-servers.net. com. 172800 IN NS d.gtld-servers.net. ;; Received 737 bytes from 192.5.5.241#53(f.root-servers.net) in 55 ms |
Step 4 | example.com. 172800 IN NS ns1.example.com. example.com. 172800 IN NS ns2.example.com. example.com. 172800 IN NS ns3.example.com. example.com. 172800 IN NS ns4.example.com. ;; Received 781 bytes from 192.52.178.30#53(k.gtld-servers.net) in 169 ms |
Step 5 | www.example.com. 300 IN A 1.2.3.4 ;; Received 187 bytes from 68.142.255.16#53(ns2.example.com) in 26 ms |
This is the exact process that goes on behind-the-scenes every time you type a URL into your web browser, or fire up your email client. This also illustrates why both DNS answer accuracy and answer speed is so important: if the answer is inaccurate, you may need to repeat this process several times; and if the speed with which you receive an answer is slow, then it will make everything you do online seem to take longer than it should. Ensuring both answer accuracy and speed is at the core of NS1’s value proposition.